LInX - the Law Enforcement Information Exchange - is an advanced information sharing system and analytical data warehouse containing information from participating state and local law enforcement agencies located within the a regional LInX system. LInX is a joint initiative sponsored by the Naval Criminal Investigative Service (NCIS) of the U.S. Department of the Navy, and various regional and local law enforcement agencies located throughout the nation.
Restrictions on the Use of LInX Data
|
The data from the LInX system is not considered, and should not be used for, original documentation for probable cause from any participating agency. Use of the data is controlled by the LInX Rules of Operation for each regional LInX system. Contact your system administrator for a copy. |
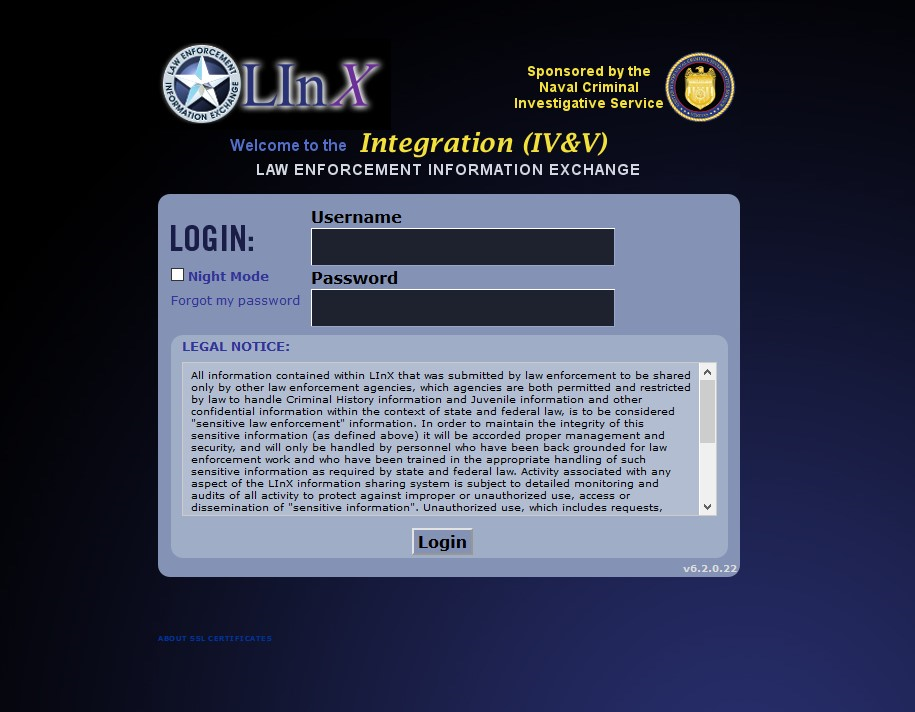
Access to LInX is via the login screen. A valid user ID and password are required to log into the system. When a user first logs in, the default screen presentation is in Day Mode. The user may choose to directly login in Night Mode by checking the Night Mode box. Additional information about Day / Night Mode can be found further along in this discussion.
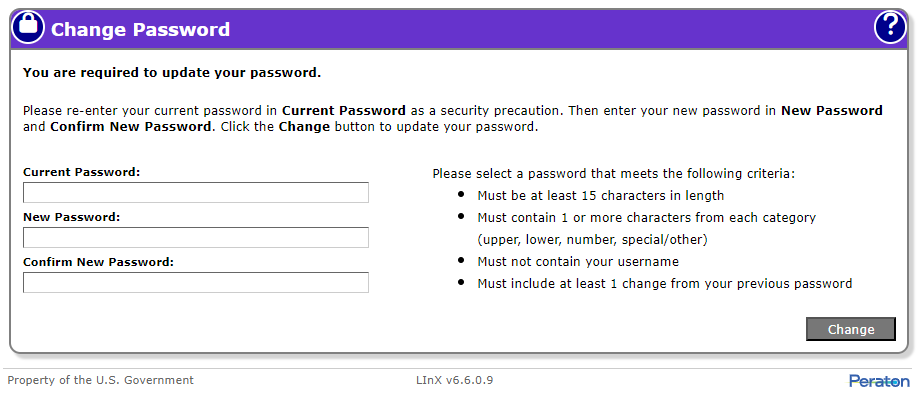
When a user initially logs into LInX with the temporary password, the Change Password screen displays for the user to enter the current password, a new password, and confirm the new password.
The next screen the user will encounter is the Challenge Questions screen. Users are required to select challenge questions and provide answers to them upon initial login to the system, or after a password reset.
Three sets of 10 Challenge questions are presented, from which the user must select 3 questions to answer. The following conditions apply:
Ø The minimum length for each answer is 3 characters
Ø A specific Challenge Question can only be used once. Therefore, as a Challenge Question is selected, it is no longer available as a possible selection for the next Challenge Question (e.g., If ”What was your high school mascot” is selected for Question 1, that option is no longer available for Questions 2 or 3)
Ø The user must re-select Challenge Questions after a password reset
Ø All three questions must be completed before the answers can be saved. If less than 3 questions contain answers, and the Save button is selected, a pop-up window will appear stating ”Please make selection for Challenge Question <#>”, where <#> is the next Challenge Question that requires an answer.
The following image shows the Change Challenge Questions screen.
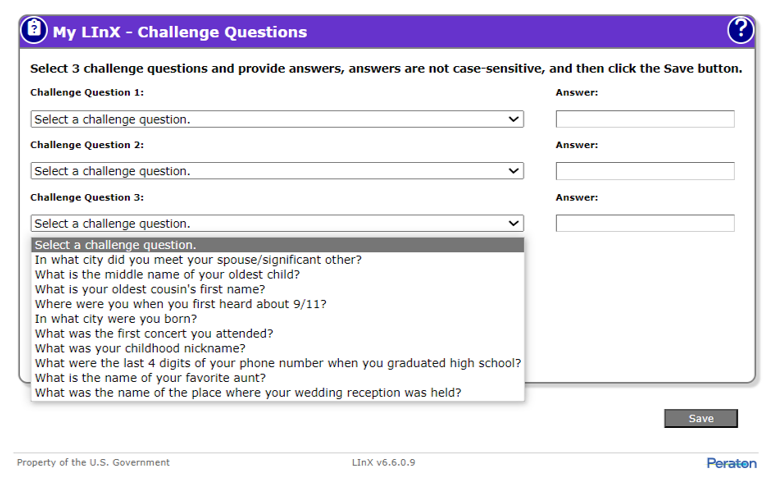
After all 3 Challenge Questions have been answered, click the Save button to save the responses.
|
Note: For security purposes, after all Challenge Questions have been saved, a user may randomly be challenged during subsequent login attempts with the presentation of a single Challenge Question, which must be answered correctly in order to continue logging into LInX. |
Additional help with Challenge Questions can be found on the Challenge Questions page by clicking on the Online Help button [![]() ] located in the upper right-hand corner.
] located in the upper right-hand corner.
After saving the Challenge Questions, the LInX User Agreements are presented.
1. The LInX Rules of Use Agreement:
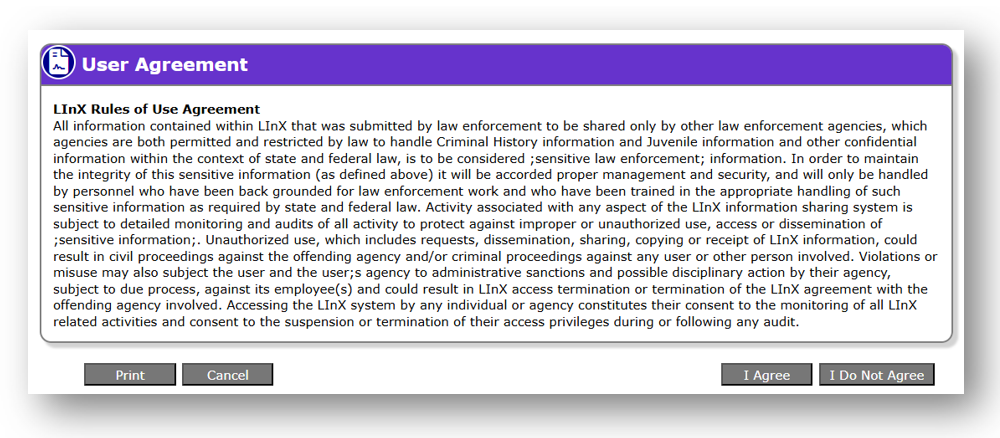
After reading the LInX Rules of Use Agreement, select the I Agree or the I Do Not Agree button.
Selecting the I Do Not Agree button immediately returns the user to the login screen.
Selecting the I Agree button allows the user to continue to the next LInX screen.
2. The Remote Data Access Agreement:
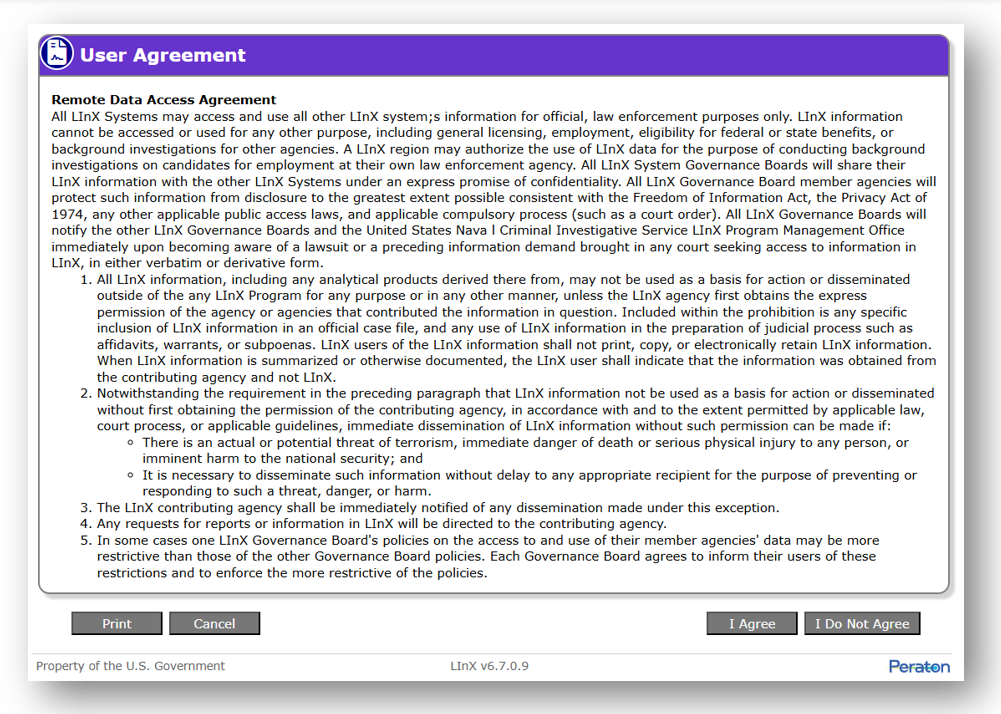
After reading the Remote Data Access Agreement, select the I Agree or the I Do Not Agree button.
Selecting the I Do Not Agree button presents the user with a pop-up message stating: "If you reject the terms of this agreement, you will not have access to data from any systems outside of the local region! Are you sure you want to reject this agreement?"
Selecting the I Agree button allows the user to continue to the next LInX screen.
The LInX User Agreements will periodically be reintroduced to the user after initial acceptance as a means of reacquainting the user with the rules, and requiring the user to continue agreement.
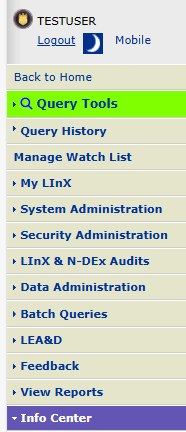
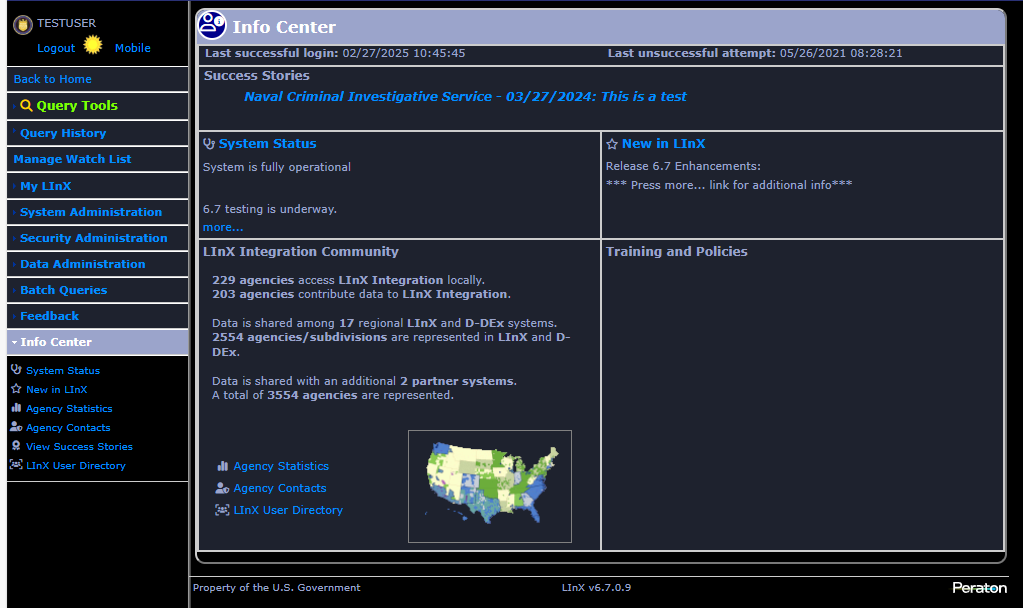
Info Center
The Info Center screen contains links to a number of sub-screens that provide a way for users to find out the latest information regarding the LInX system. The main screen is also the default LInX Home page. The Info Center screen can be accessed by clicking either the Info Center or Back to Home links located in the navigation menu bar along the left side of the screen.
Mobile Version:
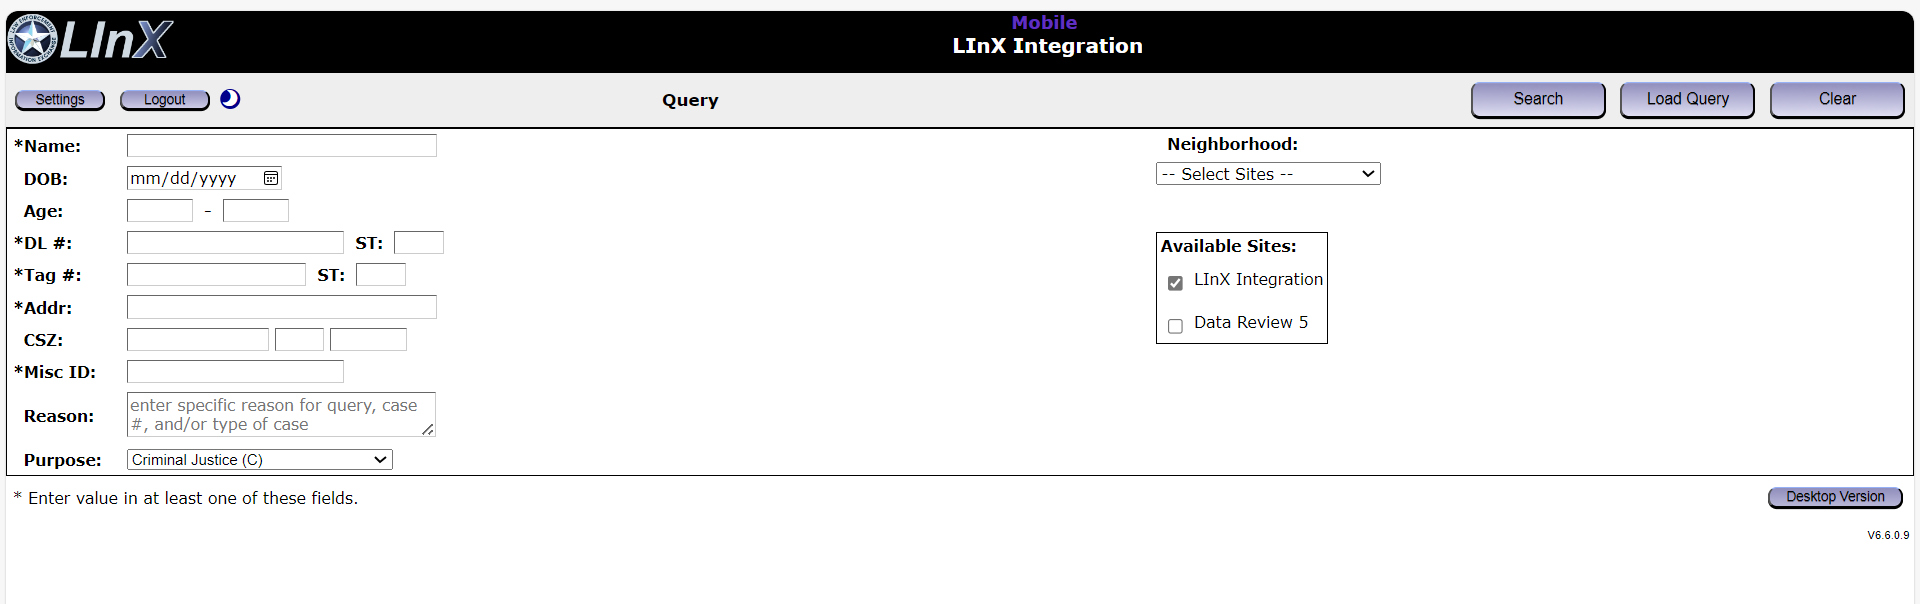
Once a user is logged in to LInX, a link to the Mobile version of the application is provided at the top left of the screen (under the Userid). The user can toggle between the mobile version and the desktop version of the application using this link and the Desktop Version link found on the Mobile query screen.
The Mobile version site offers a more streamlined query/result capability for use with mobile terminals, and is available from all screens, except Link Analysis, Feedback, System/Security Administrator screens, or when a user is viewing the application in Night Mode.
Success Stories:
The Success Stories section contains rotating snippets of Success Stories from Law Enforcement agencies. Clicking on a snippet will take the user to the Info Center - View Success Stories screen to see the selected success story. The Previous and Next buttons will move to the previous/next loaded success story. On the Info Center - View Success Stories screen are also links to Submit Your Success Story and Archived Success Stories. Selecting the Back to Home menu option from top of the left navigation menu will return the user to the main Info Center screen.
Also in this section are links to PDFs of Success Story Summaries and Archived Success Stories, both of which open in separate windows and can be printed or saved.
System Status:
The System Status section contains information about the system, such system downtime for maintenance and/or upgrades. Selecting the Back to Home menu option from top of the left navigation menu will return the user to the main Info Center screen.
New In LInX:
The New in LInX section contains information about the system and/or Governance Board to inform users and administrators. Selecting the Back to Home menu option from top of the left navigation menu will return the user to the main Info Center screen.
The New in LInX section also contains links to PDFs for the regional LInX Integration Newsletter and the latest New Features in LInX document.
Integration Community:
The LInX/D-DEx Integration Community section includes a number of links that provide specific information about the agencies associated with the user’s Regional LInX system. Selecting the Back to Home menu option from top of the left navigation menu will return the user to the main Info Center screen from any of these sub-screens.
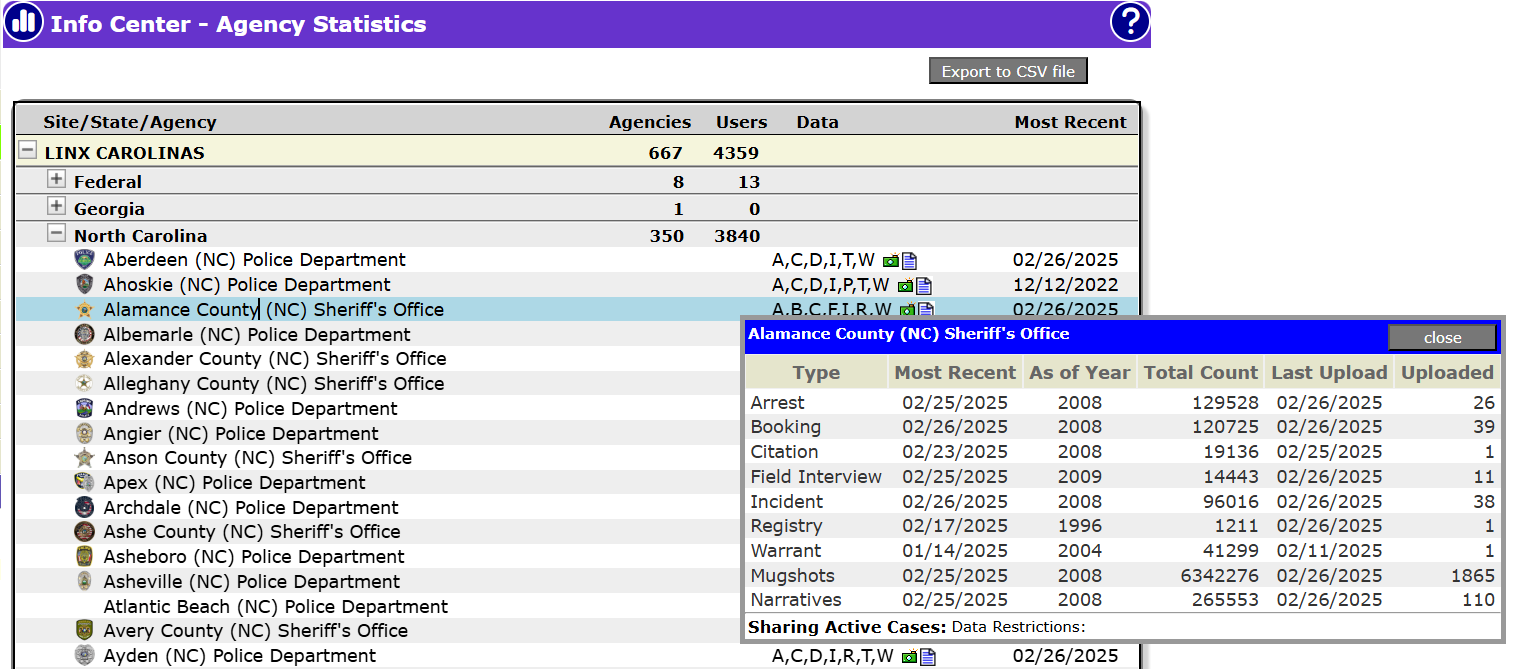
The Agency Statistics screen shows the user which agencies have data in the system and when the data was last updated. Most agencies send updates every night. Clicking on the + and - signs next to a site and state opens and closes those sections.
Agencies or organizations listed under states will provide types of data, as well as the most recent data sent to LInX. Clicking on individual lines provides a breakdown of data types and dates.
The Agency Contacts screen displays agency address, agency head, agency records division, and agency LInX Point of Contact (POC) information. Each agency's Systems Administrator is responsible for keeping this information up-to-date.
The LInX User Directory screen allows users to query LInX to find user contact information for an individual, an agency, or the entire LInX regional system. This area is built as a convenience to encourage collaboration and de-confliction among users in the LInX regional community.
Training and Policies:
The Training and Policies section contains a number of links that provide additional resources for the user, including the LInX User Guide, Quick Tips, and training. Selecting the Back to Home menu option from top of the left navigation menu will return the user to the main Info Center screen from any of these sub-screens.
The Tools section contains links to download Adobe Reader, which is required in order to view PDF documents.
Clicking the User Guide link opens a PDF of the current LInX User Operations Guide in a separate browser window, which can be printed or saved by the user. The User Guide contains all of the individual LInX Help topics that are available via the Help icon [ ![]() ].
].
The PDF window may be left open, minimized, or closed separately from the LInX application window. The PDF may also be saved or printed.
Clicking the Quick Tips link will open a PDF of the General Tips for Searching LInX document in a separate browser window, which can be printed or saved by the user. This document provides general tips to assist the user in conducting various searches in LInX.
The PDF window may be left open, minimized, or closed separately from the LInX application window. The PDF may also be saved or printed.
The Online Refresher Training area of the Info Center screen contains online resources, such as videos and PDFs, to provide the user with information about LInX background and functionality, as well as tips for searching N-DEx.
The PDF window may be left open, minimized, or closed separately from the LInX application window. The PDF may also be saved or printed.
The LInX Documents and Training area contains PDFs to provide the user with information about LInX functionality, and suggestions on how to conduct the most efficient searches.
The PDF window may be left open, minimized, or closed separately from the LInX application window. The PDF may also be saved or printed.
The Policy and Rules area of the Info Center screen contains PDFs for additional guidance to users of LInX. The PDFs available in this section may vary from LInX region to region.
The PDF window may be left open, minimized, or closed separately from the LInX application window. The PDF may also be saved or printed.
Menu Options
Availability of menu or button selections is based on user privileges. For example, if a user only has Tactical or Analytical search authority, the user will not see any of the administration menu options (System Administration, Security Administration, Data Administration).
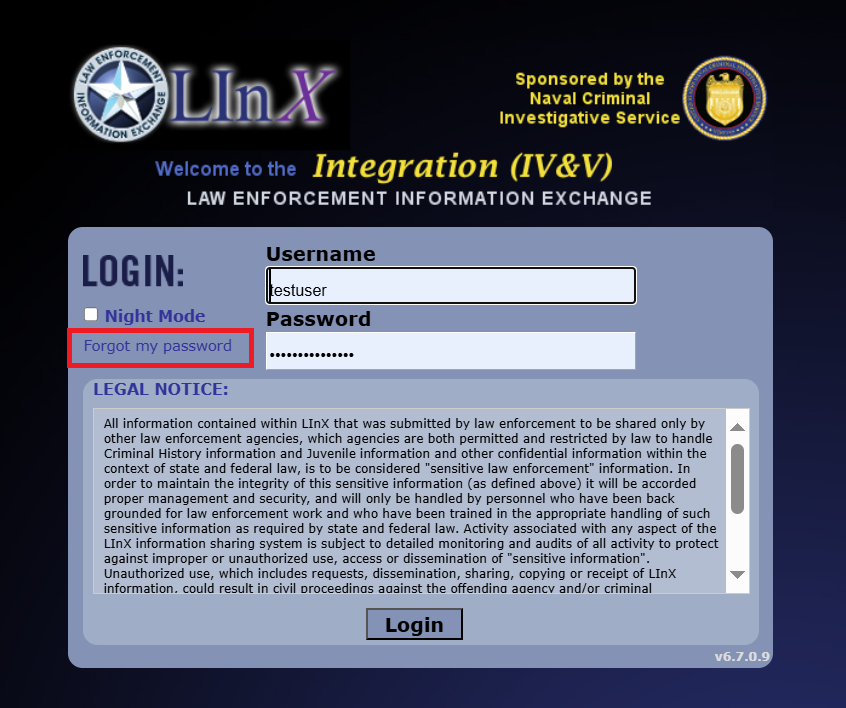
Self-Service Password Reset
This functionality allows a LInX user to initiate a self-service password reset without assistance from the System Administrator. This feature is only available to users who have previously saved the answers to their security questions AND the e-mail address associated with their LInX user account is valid.
The login screen will be re-displayed with a Forgot my password link. Clicking the link will redirect the user to the Self-Service Password Reset screen.
After the user clicks the Forgot my password link, the system will send a one-time user code to the e-mail address associated with the User ID and open a Self-Service Password Reset window. The user code will expire after 20 minutes. If the code has not been used within the 20 minute period, the user must repeat the password reset process.
|
Note: Do not reply to the self-service reset password e-mail.
|
The user is required to enter the security code as well as successfully answer a security question in the Self-Service Password Reset window before being prompted to change their password.
If the user account has been locked by too many incorrect login attempts, or by answering any of the security questions incorrectly, the user must contact their System Administrator to reset their password.
If, for any reason, Self-Service Password Reset cannot be used, the user will receive a message to contact their System Administrator for a reset.

The user will be required to change their password upon logging into the LInX system with the temporary password.
Password Expiration Notice
LInX user passwords are set to expire every 60 days. When there are 14 days left until the password is due to expire, a Password Expiration notice will appear on the top of the home screen after login. The password expiration message will be repeated at each subsequent login until the 14th day, when the user will be forced to change their password. If the option to change the password is chosen, the user will be taken directly to the Change Password screen.
If the user continues to use the system without changing the password, an alert message will appear on the LInX startup screen indicating how many days are left to make the change.

Inactivity
The system will automatically log off a user after a period of inactivity on the system as determined by the security accreditation rules. Prior to being logged out, a Session Timeout alert message will appear, advising the user that the session will time-out in about 2 minutes, and asking the user if they would like to extend their session. If Extend Session is selected, the user will remain logged in for an extended period equal to the session setting.

If Logout is selected, or no selection is made within 2 minutes, the user will be logged out of the system and retuned to the Login screen. The user will be required to repeat the login process if this happens.
Logging out
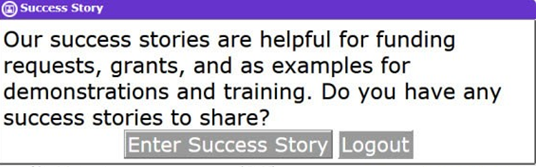
The user can log out from any of the LInX menu or functional screens by selecting the Logout option located in the upper left-hand corner of the Navigation menu. Periodically the user will be prompted for Success Story feedback upon logout.
The system will complete the logout process if the user does not respond to the prompt for feedback within a defined timeout period.
Exiting the system by closing the browser window instead of logging out will result in an automatic logout.
Screen Selection
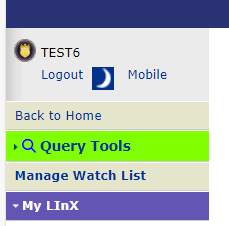
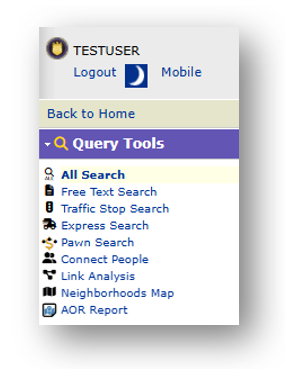
Each screen in LInX provides a menu bar (sometimes called a navigation tool bar) along the left side of the screen. This allows the user to select the specific LInX functions to perform. The user’s ID is displayed at the top of the menu.
|
|
|
Some menu items expand, displaying sub-menus, allowing the user to select specific types of operations in that area. After a selection is made, the area in which the user is operating will be highlighted and the screen that is in use will appear in bold:
DAY / NIGHT MODE
This capability allows the user to toggle between Day Mode and Night Mode using the Sun / Moon icon, located under the user name on the top left side of the LInX screen. A screen in Night Mode will have a darker background, and colored text and input fields so it does not impair a user’s vision in a car at night.
Note that not all screens are available in Night Mode.
The following screens are available in Day Mode only:
Mobile Version
Help screens
System Administration
Security Administration
Link Analysis
AOR Report
View Reports
Info Center menu items and links
The screen example below shows the main screen in Night Mode.
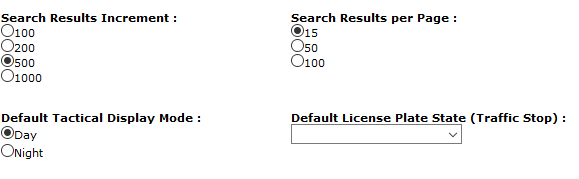
NOTE: An option to set Day Mode or Night Mode as a user's default login display can be selected under My LInX / Set Preferences, Default Tactical Display Mode. If Day Mode is selected in Set Preferences, users may still select the Night Mode check-box on the login screen for that login session.
Error Messages
Error messages will appear in pop-up windows when an error is made or a process has not been completed properly. By clicking the ”OK” button, the message will be cleared from the screen so that the screen activity can continue.

Navigation/Process Selection Buttons
Each operation within the LInX system has function buttons on the page to start the operation, and to take the user to the next page. The buttons are clearly labeled to indicate which operation is being selected.

same Page Navigation
Same-page navigation tools are used to move around, and to select specific actions on a single screen. The tools are described below:
Moving Between Fields:
The user can ”mouse” from field to field or use the Tab key to move between fields. Either technique can be used to enter data in a field or to move between fields.

Scroll Bars:
Scroll bars are provided when the information shown on the screen cannot be seen all at once. The horizontal scroll bar enables the user to view items that are not visible to the right or left of the window. The vertical scroll bar enables the user to view items that are not visible on the top or bottom of the window.
If there is hidden text on the screen, a slider bar will be visible. The hidden text can be viewed by selecting the slider and moving the cursor in the direction of the hidden text, or by selecting the up or down arrows on the slider bar.
Tabs:
The Structured Search results screen has folder tabs across the top that allow the user to move from one tab to another by using the mouse to click on the desired tab.

Standard Data Entry Fields:
Data can be entered directly in the field text boxes provided on the screens. Where specific formatting is required, the format will be shown next to the field (for example, date must be entered as ”MM/DD/YYYY” or "YYYY").
Drop-Down Lists:
Some fields provide a list of options that may be selected for data entry. To select an option, place the cursor over the arrow and press the mouse button. With the list displayed, select an item from the list by clicking the mouse button with the cursor held over that item; or type the first letter of the item in the field to bring up the item(s) beginning with that letter for selection. Selecting the desired option will close the list and display the selected item in the field. Longer lists include a vertical scroll bar that can be moved to display more options.

Check Boxes:
Check boxes are used when several options can be selected at one time. Check boxes operate as a toggle (on/off). To select an option, place the cursor over the check box for the desired option and click the mouse button. To deselect the option, the action can be repeated and the box will clear.
Selection Buttons:
Selection or ”radio” buttons allow the user to choose a particular action by clicking on the button to indicate that action has been selected. To select an option, place the cursor over the radio button for the desired option and click the mouse button.
If the button is filled in, the action selected will be performed. By clicking on another button, the first selection will be cleared and the new selection will be selected.
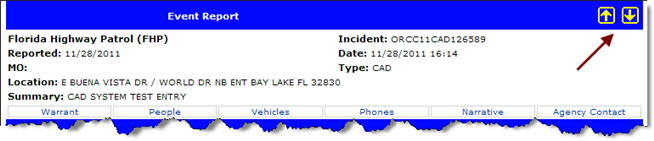
Arrows:
Arrows allow the user to navigate up and down through search results, as well as Event Reports. If the first record or report is selected, only the down arrow will be available if other records exist. If the last record or report is selected, only the up arrow will be available.
Online Help for the LInX application can be accessed from any LInX screen simply by clicking on the Help button [ ![]() ] located in the upper right-hand corner of the LInX screen.
] located in the upper right-hand corner of the LInX screen.
The Online Help screen opens in a separate window, and the help topic initially displayed will be specific to the screen that launched the request. The user may scroll through the help file for information about the specific topic.
The Online Help window also contains a navigation menu to the left of the help topic, with links to other LInX help topics. Using the Help navigation menu, the user may select and display other Help topics without leaving Online Help.
Note that the link to the topic currently displayed is highlighted in the navigation menu.
Clicking on a topic name will highlight the topic in the navigation menu and bring up the applicable topic in the viewer.
The navigation section may be closed by clicking on the "X" in the upper right-hand corner of the navigation menu. This will enable the viewer to make use of the full Online Help window.

Searching Online Help Files
The Search bar located directly above the navigation menu and viewer provides a number of ways for a user to search through the Online Help files.
The Contents selection displays the Online Help Table of Contents (TOC) of available help topics. A user may access any topic in the TOC by clicking on the topic name.
The Index selection displays an alphabetical list of keywords, phrases, or headings found in the various help files. The user may click directly on an entry in the list. If the entry is only used in one topic, that topic will be displayed in the viewer.
If the entry is used in multiple topics, when the user clicks on the entry, a pop-up list of all topics containing the entry will be displayed. The user may select the specific topic, which will then be displayed in the viewer.
The Search selection provides a text box in which a user may enter one or more terms to search for. There is also a check-box option to highlight the search results, which is the default setting.
All topics that contain the search criteria will be returned. The user may click on one of the returned topics, which will display the topic in the viewer. If the "Highlight search results" box was checked, all matches to the search criteria within the topic will be highlighted.
Note: Commonly used words, such as "a", "the", "with", etc. are ignored in all searches.
Alternatively, a user may conduct a search from the search bar located above the viewer window, by entering a search term and clicking the GO button. A list of topics containing the search criteria will be displayed.
Printing Online Help Files
An Online Help topic may be printed by right-clicking anywhere within the body of the topic, and selecting Print from the pop-up menu.
Note: Selecting Print from the browser's File menu will only print the first page of the help file.
Tactical and Analytical users should contact their System Administrator or Agency Administrator when they are having problems accessing or using LInX.